
The Ultimate Flower Painting Masterclass
Painting Flowers In Acrylic
Whether you’re a total beginner or a seasoned painter, join over 500 satisfied artists painting soft, realistic florals in this step-by-step course.
Start Your Painting Journey For $197 USD ($247 CAD)
What Artists Are Saying
"Marianne’s online painting course is so fun and professional which makes you want to keep on going. The instructions are so clear and easy to follow as she shows everything precisely every step of the way."
- Nevine Y.

What is Painting Flowers in Acrylic?
Have you ever wanted to paint realistic flowers in acrylic, but felt unsure where to start or how to improve? If you’d like to strengthen your color mixing, brushwork, and process to create beautiful floral paintings, this course is for you.
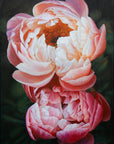
Painting Flowers in Acrylic is a 23-lesson, 7.5-hour, video-based course designed to guide you step by step through colour mixing and petal studies. Your final work will be a detailed painting of two coral charm peonies in acrylic.
Since its inception, Painting Flowers in Acrylic has supported over 500 artists worldwide, many of whom have gone on to sell their work in galleries, festivals, and to private collectors.
Whether you’re a beginner or an intermediate painter, this program will give you the skills and understanding you need to create beautiful floral paintings that truly stand out.

don't love it? No problem.
This course comes with a 30 day Money Back Guarantee, no questions asked. Simply send me an email with your request, and you'll be promptly refunded.
What You Will Learn:

Aspect ratios, materials, priming and preparing your canvas, and creating and using a wet palette.

Canvas board studies, including mixing tones, identifying and mixing colors, and petal studies.

Learn how to transfer your drawing, and use a two-layer system to paint showstopping coral charm peonies.
What's Included
- 23 video lessons in 4K.
- Lifetime access to the course, including updates and improvements.
- Access to Marianne's Flower Reference Photo Library
- Detailed course pack with shopping lists, resource links, additional information about acrylic painting, and more.
- Reference Photo with both original image and contoured edges for ease of transfer onto the canvas
- Lifetime access to a private Facebook group and online community, only accessible for students of paid courses, with direct access to Marianne.
- Bonus Iris sketchbook painting class with reference photo (4 hours, valued at $99 USD).
- 30 Day Money Back Guarantee
Total value: $447 USD - yours for $197 USD ($247 CAD)

Course Curriculum
Lesson 1 - Introduction: You’ll be walked through some important considerations to bear in mind before starting on your flower painting journey, including lighting your workspace, characteristics of acrylic paints, and working with a reference photo. You’ll also be introduced to the learning log in the course pack, so you can keep track of your learning as you progress through the course.
Lesson 2 - Aspect Ratios: You’ll learn all about how aspect ratios affect canvas size, and will be thoroughly educated about the importance of choosing a canvas size that matches the cropping of your reference photo to ensure that your drawing is transferred accurately
Lesson 3 - Materials: You’ll be introduced to all of the materials that you will require for the course, including canvases, gesso, paints, brushes, and mediums. Even though this course will barely use any medium whatsoever, you will still be taught about various popular mediums, in case you would like to experiment with any of them throughout your painting or your practice.
Lesson 4 - Priming and Prepping your Canvas: You’ll learn how to use gesso, paint, and sandpaper to create a work surface that better facilitates realism. You’ll prepare not only your canvas for the painting itself, but several canvas boards to have available for your colour mixing lessons and petal studies.
Lesson 5 - Creating a Wet Palette: If you’re frustrated by how quickly acrylic paint dries on your palette, this lesson will ensure that you will never have to deal with that problem again. You will be walked through the process of creating a wet palette that will keep your paints workable for the entirety of your painting session.
Lesson 6: Introduction to the Canvas Board Studies: We will look at using canvas boards as a tool for mixing tones, colours and painting petals. You’ll also be introduced to the concept of colour context, and learn about how it deeply impacts your ability to interpret and mix colour.
Lesson 7 - Mixing Tones: In this real-time demonstration, you’ll paint alongside me to create a board with various tones on it that will form the backbone of colour mixing for flowers.
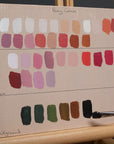
Lesson 8 - Identifying and Mixing Colours: In this real-time demonstration, you’ll identify colours in your reference photo, isolate them, and mix them using the colours in your limited palette. You’ll be taught how to increase or tone back saturation, mix challenging colours such as greens and mauves, and walk away with a swatch board containing every colour that you will be mixing to paint the peonies in the next half of the course.
Lesson 9 - Petal Studies: You will paint two petal studies; a soft, muted petal and a vibrant, saturated petal. Each petal will take approximately half an hour to complete. You’ll be encouraged to approach the petals as sketches, not getting too bogged down in perfection, and taught how to begin with a base layer before making slight colour modifications to gradually build realism.
Lesson 10 - Consolidation: We’ll reflect on your progress made, revisit where you started versus where you are now, and celebrate your success in making it through the first half of the course.
Lesson 11 - Introduction to the Peonies: Before you start painting, let’s discuss a few important points such as progress over perfection, making adjustments, and working with the reference snapshots that have been overlaid throughout the painting modules to help you compare the painting directly to the reference photo.
Lesson 12 - Transferring the Drawing: If you have ever struggled with transferring the drawing from the reference photo to the canvas, this module will teach you how to get an accurate rendering using the grid method. You’ll build upon your previous knowledge of aspect ratios to create a grid that will support your drawing and painting process.
Lesson 13 - Painting the Background: Learn to paint a background that’s blurred and out of focus, mimicking the aperture of a camera.
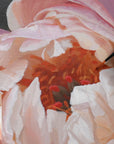
Lesson 14 - First Layer - Painting the Top Peony Centre: We’ll start with the focal point of the top peony, and add the first layer of the heart of the peony.
Lesson 15 - First Layer - the Lighter Petals: Begin building depth in your peony by working in concentric circles around the focal point centre. In this module, you’ll add in the lighter petals only, working your way around the flower like a clock before moving towards the outer edges.
Lesson 16 - First Layer - the Outer Petals Pt. 1: This module has been split into two parts to make it easier to track progress. Now that you have the lighter petals layered in, it’s time to move to the outer edges of the petals, where richer, more intense colours await. You’ll work with both warm and cool reds to create a beautiful range of tones that will suggest depth.
Lesson 17 - First Layer - the Outer Petals Pt. 2: Continuing from the previous module, you’ll work on the bottom petals of the top peony, using soft blends to make your brushstrokes invisible and add to the realism.
Lesson 18 - First Layer - the Bottom Peony: Moving from the soft, airy tones of the top peony, you’ll begin working on the bottom peony. Instead of mixing colours as you go along, you’ll instead mix your colours up front to have a full palette to work with. You’ll learn about some of the challenges of transparency that accompany working with dark colours, and how to overcome them.
Lesson 19 - Introduction to the Second Layer: We’ll begin by celebrating your accomplishments in having completed the first layer, before discussing what you can expect in the second. We’ll talk about the importance of critically weighing which adjustments you’d like to make, and what to do if you make an unsuccessful adjustment.
Lesson 20 - Second Layer - the Background and Centre Details: We’ll revisit the background to make any final adjustments before adding in important details in the centre of the flower. You’ll be introduced to how adjustments work in the second layer of an acrylic painting, before painting in the stamens and adjusting the carpels of the top peony.
Lesson 21 - Second Layer - Finishing the Flowers: Using a screenshot demonstrating the difference between the first layer and second layer, you’ll be coached through the process of adjusting and tweaking your painting to calibrate it and make it appear more lifelike. You’ll be invited to check against your own reference photo and make changes that you need to make on your end instead of copying what you’re viewing on the screen. You’ll be reminded of important questions to ask yourself while considering which adjustments to make.
Lesson 22 - Signing the Painting and Varnishing: One of the most satisfying feelings of finishing a painting is signing your name. In this module, you’ll be shown how to keep your signature unobtrusive and straight, before walked through the optional stage of varnishing.
Lesson 23 - Conclusion: Let’s take a moment to celebrate your accomplishment…you did it! Now, the most important thing is for you to keep going, and to treat this course as the launch for many flower paintings to come.

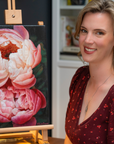
Marianne Vander Dussen
Meet Your Instructor
I’m a Canadian fine artist and trained educator (BEd, MEd, OCT) who has been teaching artists around the world since 2016. I’m passionate about supporting you as you build strong skills, feel more confident in your work, and enjoy learning to paint, whether you’re just starting out or have been painting for years.
In my lessons, I break down complex techniques into practical, easy-to-follow steps using acrylic, oil, and sketchbooks. Through my YouTube tutorials and structured courses, I guide you in developing strong foundations, painting with intention, and progressing at your own pace.
Learning to paint isn’t always easy, and there are plenty of moments when things don’t go as planned. I’m here to walk you through those moments, understand what’s happening, and keep moving forward. My goal is to help you feel capable, encouraged, and excited to keep creating.

Start Painting With Confidence
Get instant, lifetime access to every lesson. Learn at your own pace, anytime. Your creativity is worth the investment.

FAQ's
YES! Purchasing this course gains you access for life. You'll also gain lifetime access to our painting course community group on Facebook!
YES! Morning person or night owl, you can work on the course at your own pace, in whatever time zone you're in.
I'm proud to offer a 30 day satisfaction guarantee. If you don't feel like the course was what you were expecting, send me an email and you'll receive a prompt refund to your method of payment.
Students of this course are my highest priority. If your question is urgent, you can write me at info@mariannevanderdussen.com, and I will personally respond within 24 hours.
If the question is of a non-urgent nature, or you want some feedback on your work, you can submit your work to our private Facebook group for community and instructor assessment.
The cost of the course is listed in US dollars, but upon payment will be converted to the currency of your country. I am happy to be working with students from all over the world, including the United States, Canada, Portugal, Spain, France, Sweden, South Africa, Australia, New Zealand, and many more!